To photograph your makes like a pro without fancy gear, focus on using natural, soft light—shoot during golden hour or near windows—to highlight textures and details. Keep backgrounds simple and clutter-free, choosing neutral or complementary colors. Experiment with different angles and perspectives, and add props or scene elements that tell your story. Finish with free editing tools to enhance your images subtly. Keep exploring these tips to elevate your craft photos effortlessly.
Key Takeaways
- Use natural light during golden hour or near windows to evenly illuminate your items without expensive equipment.
- Keep backgrounds simple and clutter-free, choosing neutral or complementary colors to highlight your make.
- Experiment with different angles and perspectives to showcase textures and details creatively.
- Incorporate minimal, purposefully chosen props to add context and interest without overwhelming the main item.
- Edit photos subtly with free software, adjusting brightness, contrast, and cropping for a polished, professional look.
What Are the Key Elements of a Great Photo of Your Handmade Item
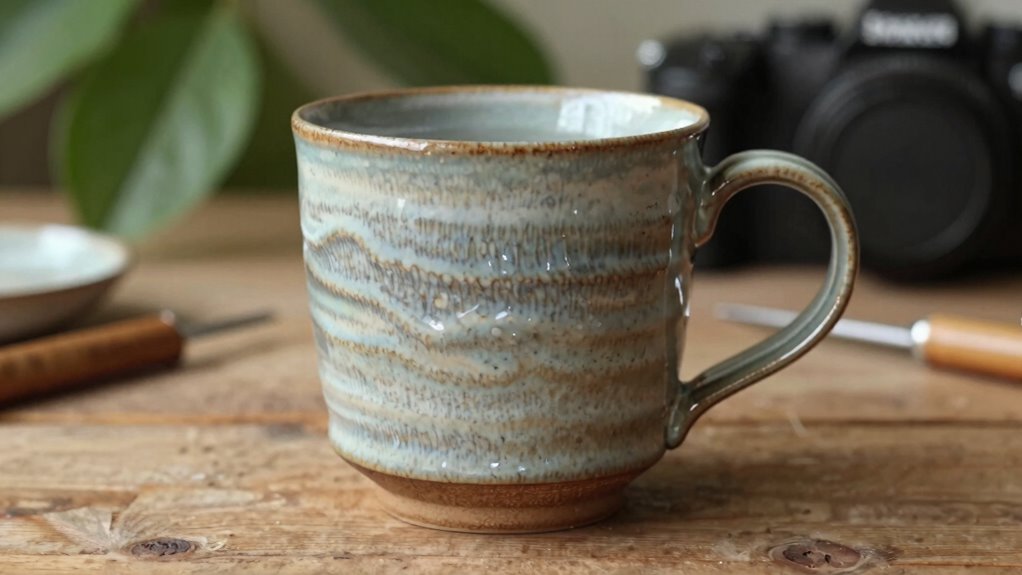
To capture a great photo of your handmade item, focus on highlighting its unique details and craftsmanship. Achieving strong color harmony ensures your photo looks cohesive and appealing. Use complementary or harmonious colors to make your item pop without overwhelming the viewer. Establish clear focal points to draw attention to the craftsmanship and intricate details that make your piece special. Avoid cluttered backgrounds that distract from your focal points; instead, choose simple, clean settings that enhance your item’s features. Good composition guides the viewer’s eye naturally to the most important aspects of your handmade creation. Additionally, understanding how color accuracy impacts the appearance of your photos can help you better represent your work’s true colors and quality. Maintaining lighting conditions is crucial to achieve accurate color representation and highlight your item’s details effectively. Being mindful of background choice can significantly improve the overall quality and professionalism of your photographs. Paying attention to camera settings can help you optimize your shot without relying on fancy gear, ensuring your images accurately reflect your craftsmanship. Incorporating proper lighting techniques can further enhance the visibility of intricate details and improve overall photo quality. By balancing color harmony with well-defined focal points, you create compelling images that showcase your work’s true beauty and craftsmanship.
How to Use Natural Light to Showcase Your Creations

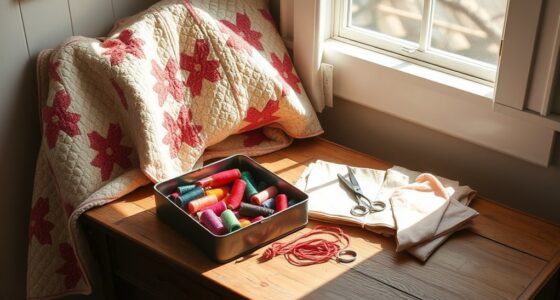
Using natural light is one of the best ways to make your handmade creations truly stand out in photos. Natural sunlight creates vibrant colors and subtle shadow play that add depth and dimension. To maximize this, shoot during the golden hour—early morning or late afternoon—when light is soft and warm. Position your makes near a window or outdoors for even illumination. Experiment with shadow play by moving your item around, highlighting textures and details. Keep an eye on how shadows fall to avoid harsh contrasts. Additionally, understanding how credit card security measures protect digital transactions can be an inspiration for ensuring your online sales are secure. Recognizing how lighting conditions influence photo quality can help you achieve consistent, professional-looking images. Moreover, being aware of market volatility can guide you in timing your product promotions for optimal visibility and success. By paying attention to wood movement and how it affects your pieces, you can better showcase the craftsmanship and durability of your makes. For consistent results, familiarize yourself with how dog breeds have different physical features that can influence how they appear in photos, especially for pet-related makes.
Choosing Simple Backgrounds to Make Your Makes Pop

Choosing simple backgrounds guarantees your handmade creations stand out and catch the viewer’s eye. A clean, uncluttered background emphasizes your makes without distraction. Focus on color coordination by selecting backgrounds that complement or contrast with your project’s hues, making your makes pop. Avoid background clutter, which can divert attention and create visual confusion. Solid colors, neutral tones, or simple textures work well to highlight details and craftsmanship. Keep the background consistent and unobtrusive, so the focus remains on your creation. Remember, the goal is to showcase your work clearly and beautifully. With a straightforward background, your makes will shine naturally, allowing their unique features to take center stage in every shot. Using the right background can also help enhance your smartphone photography by reducing distractions and highlighting your subject.]
Easy Composition Tips to Improve Your Photos
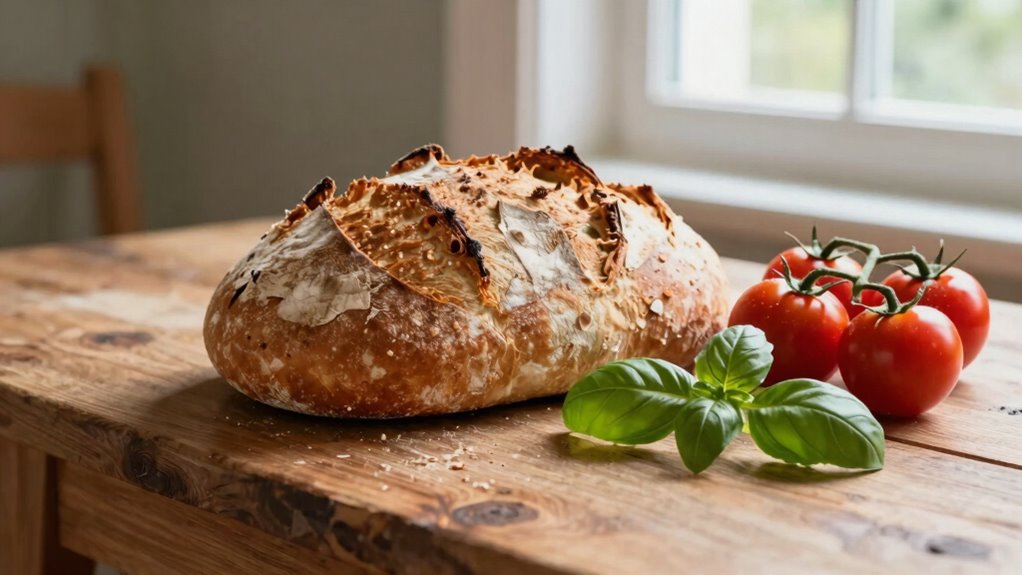
Easy composition can make a big difference in showcasing your makes effectively. Start by arranging your items thoughtfully, ensuring they don’t clutter the frame. Use DIY lighting to highlight textures and details, avoiding harsh shadows by diffusing light with a simple sheet or paper. Pay attention to color harmony; choose background and props that complement your makes’ colors to create a cohesive look. Keep the focus on your item by placing it according to the rule of thirds, which draws the viewer’s eye naturally. Simplify your scene—less is often more—and experiment with different arrangements until you find what looks best. Clear, balanced compositions help your makes stand out and look professional, even without fancy gear. Additionally, consider ventilation considerations to ensure your space remains comfortable and safe during photography. Proper air circulation can also prevent unwanted humidity or odors from affecting your setup. Maintaining good airflow can also help keep your workspace comfortable and safe during extended shoots. For example, understanding how electric dirt bikes produce horsepower can inspire dynamic ways to display your makes in action, adding excitement to your photos.
Finding the Best Angles and Perspectives for Your Shots

Have you ever noticed how a simple change in angle can transform a photo? Experimenting with different angles and perspectives can reveal new details and emphasize your make’s best features. Try shooting from slightly above to give a clear view or get down low to create a dramatic effect. Play with framing techniques by cropping tightly to focus on specific areas or stepping back for context. Changing your perspective can also highlight textures, shapes, and colors that might go unnoticed otherwise. Remember, the key is to be intentional—move around and see your make from multiple viewpoints. By exploring various angles and perspectives, you’ll discover the most flattering and eye-catching shots, making your photos look professional even without fancy gear. Utilizing Suprem fabric’s versatile applications can also inspire creative styling choices that enhance your visual storytelling. Additionally, understanding wall decor security techniques can help you set up your background without worry of damage or accidents. Being aware of lighting techniques can further improve your photos by ensuring your subject is well-lit and vibrant. Incorporating knowledge about proper lighting can make a significant difference in how your photos turn out.
Adding Props and Setting the Scene to Tell Your Make’s Story

Choosing the right props helps highlight your make’s purpose and personality. Setting the scene creates a mood that draws viewers in and tells a compelling story. When you select relevant items and craft a fitting environment, your photos become more engaging and meaningful.
Choose Relevant Props
Adding relevant props can transform a simple make photo into a compelling story. Focus on careful prop selection to support your make’s theme or style. Choose items that complement the colors and details of your creation, ensuring color coordination enhances the overall look. Props should add context without overwhelming the main focus. For example, if your make has a vintage vibe, include retro accessories or antique-inspired backgrounds. Keep the props purposeful and aligned with your story, avoiding clutter. Thoughtful prop selection not only highlights your make’s features but also creates visual interest. Remember, less is often more—select a few meaningful items that enhance the scene and help viewers connect with your creation. Incorporating appropriate backdrops and settings can further emphasize your theme and elevate your photographs. Additionally, considering energetic alignment when choosing props can help you create a more harmonious and captivating composition. Paying attention to visual balance ensures your scene remains aesthetically pleasing and directs viewers’ focus effectively. Being aware of potential distractions from unnecessary items can help maintain the viewer’s attention on your make.
Create Context and Mood
To truly tell the story of your make, setting the scene and creating the right mood is essential. Begin with a thoughtful lighting setup that highlights your project’s details and evokes the desired emotion. Soft, warm light can create a cozy, inviting feel, while bold, dramatic lighting adds intensity. Consider color harmony by choosing props and backgrounds that complement your make’s colors, enhancing its visual appeal. Use props to add context—tools, fabrics, or everyday items that tell a story about your creation. These elements help viewers connect with your work on a deeper level. Adjust your lighting and colors until the scene feels cohesive and authentic. Incorporating lighting techniques can significantly elevate your photos and make your make stand out. Utilizing composition principles ensures your shot is balanced and visually engaging. This thoughtful approach transforms a simple photo into a compelling narrative.
Editing Your Photos With Free Tools for a Professional Look

You don’t need expensive software to give your photos a professional touch. Start by choosing user-friendly free tools that fit your needs, then learn simple editing techniques like cropping and adjusting brightness. Adding filters can further enhance your images, making your makes stand out effortlessly.
Choosing the Right Software
Choosing the right software is essential for transforming your makes into professional-quality photos without spending a dime. With so many software options available, selecting the best editing apps can seem overwhelming. Focus on user-friendly tools that offer essential features like cropping, adjusting brightness, and color correction. Free options such as GIMP, Paint.NET, or online editors like Pixlr provide powerful editing capabilities without requiring advanced skills. These apps are designed to help you enhance your photos quickly and easily, giving your makes a polished look. Test a few to see which interface suits you best. Remember, the goal is to find software that simplifies editing while offering enough control to improve your images professionally.
Basic Editing Techniques
Ever wondered how to make your makes stand out with just a few simple edits? Basic editing techniques can transform your photos and give them a professional look. Start by adjusting your lighting techniques to brighten shadows or tone down overly bright areas, making your makes pop. Use free editing tools to tweak brightness, contrast, and exposure—these camera settings help balance the image. Cropping can improve composition, removing distractions and focusing attention on your makes. Straightening the image ensures everything lines up correctly. Avoid over-editing; subtle adjustments often produce the best results. Remember, good lighting and proper camera settings set the foundation—editing simply enhances what you’ve already captured, making your makes look polished and eye-catching without the need for fancy gear.
Enhancing With Filters
Once you’ve made basic adjustments to your photos, adding filters can give your makes a polished, professional appearance. Filter effects can subtly enhance colors, add mood, or create a cohesive look through color grading. To maximize their impact, consider these tips:
- Choose filters that complement your subject’s tones and mood.
- Adjust filter intensity to avoid overprocessing.
- Experiment with color grading to set a consistent aesthetic across multiple photos.
- Use filters to highlight details or create contrast, making your makes stand out.
Filters are powerful tools that can transform simple shots into professional-looking images. When used thoughtfully, they help convey the right vibe and make your makes look more polished without expensive editing software.
Common Photography Mistakes to Avoid When Shooting Your Make

Even experienced photographers can fall into common pitfalls when shooting their makeup looks. One major mistake is poor lighting, which can wash out colors or create unflattering shadows. Always guarantee your lighting is even and natural or use a consistent light source to highlight details. Focus errors are another frequent issue; blurry images happen when your camera isn’t properly focused on the makeup details. Double-check your focus before snapping the shot, especially on the eyes and lips. Avoid rushing, and use tap-to-focus if needed. Additionally, pay attention to your angle and distance—too close or too far can distort features. Steady your shot with a tripod or stable surface. By avoiding these lighting mistakes and focus errors, your makeup photos will look sharp, vibrant, and professional.
Frequently Asked Questions
What Camera Settings Should I Use for Different Lighting Conditions?
For different lighting conditions, adjust your aperture settings and ISO to get the best shot. In bright light, use a smaller aperture (like f/11 or higher) and low ISO (100-200) to avoid overexposure. In low light, open up your aperture (f/2.8 or lower) and increase ISO (800 or higher) to brighten your image without sacrificing too much detail. Experiment and review your shots to find the perfect balance.
How Can I Stabilize My Camera for Sharper Photos?
To stabilize your camera for sharper photos, use a sturdy tripod to guarantee maximum stability, especially in low light or long exposures. If you’re shooting handheld, apply proper techniques like holding your camera close to your body, keeping elbows tucked in, and using both hands. Additionally, stabilize yourself by bracing against a solid surface. These methods improve tripod stability and enhance handheld technique, resulting in clearer, sharper images.
What Are Some Affordable Lighting Options for Indoor Shooting?
Did you know that 80% of professional photographers rely on affordable lighting solutions? You can easily improve your indoor shots with DIY diffusers made from white fabric or paper lanterns, which soften harsh light. Pair these with affordable reflectors—like foam boards or aluminum foil-covered cardboard—to bounce light and fill shadows. These budget-friendly options give your photos a professional look without breaking the bank.
How Do I Photograph Small Items Without Distortion?
To photograph small items without distortion, you should use a macro or prime lens with minimal lens distortion. Position your camera directly above the object to maintain perspective control, avoiding angled shots that cause distortion. Keep your distance consistent and use a stable tripod for sharp images. Adjust your aperture to ensure even focus. This approach helps you capture true proportions and details, making your shots look professional and distortion-free.
Can I Use My Smartphone’s Camera for Professional-Looking Product Photos?
Yes, you can use your smartphone’s camera for professional-looking product photos. In fact, 85% of consumers say they prioritize product images when shopping online. Focus on good image composition by framing your item well and avoiding clutter. Choose a clean, simple background that highlights your product. Use natural light whenever possible, and consider editing with apps to enhance clarity and color, giving your photos a polished, professional look.
Conclusion
Remember, great photos aren’t about fancy gear—they’re about capturing your passion and story. Like a painter with a simple brush, you can create stunning images with natural light, thoughtful composition, and a keen eye. Keep practicing, avoid common pitfalls, and let your creations shine. Just as a storyteller weaves magic with words, your photos can enchant viewers and draw them into your handmade world—proving that beauty truly comes from the heart.