
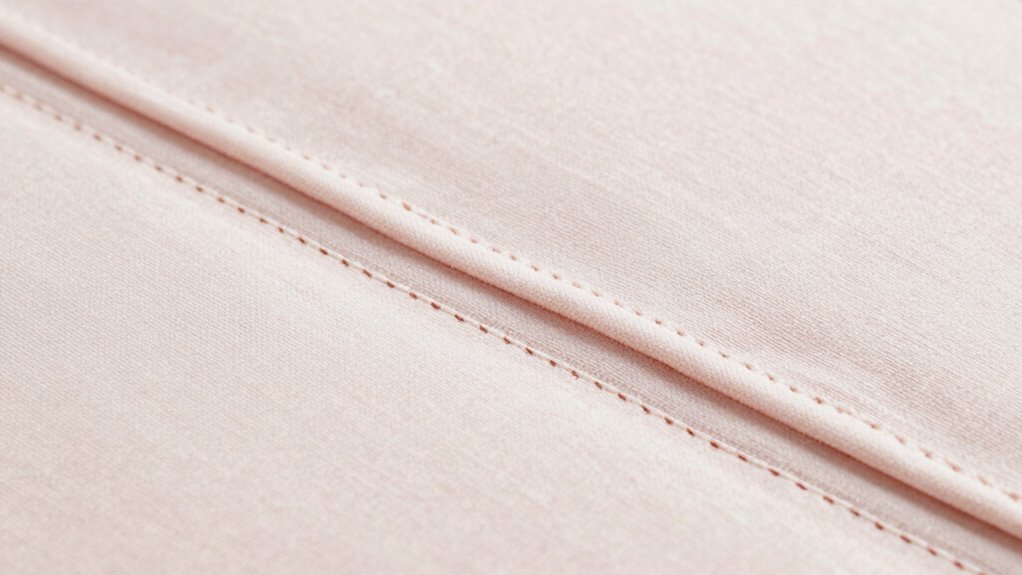
To make seams nearly disappear with mattress stitch, you should match stitches precisely on both sides and maintain consistent, gentle tension throughout. Use sharp needles and high-quality thread suited to your fabric, and pin edges firmly for perfect alignment. Focus on even seam tension and check regularly for puckers or gaps. With practice, you’ll master how to create nearly invisible, professional-looking joins—get ready to learn all the key steps for flawless finishes.
Key Takeaways
- Use the classic mattress stitch with even tension and precise edge alignment for a seamless, nearly invisible join.
- Match stitches on both sides carefully, maintaining consistent tension to prevent puckering or gaps.
- Choose appropriate needles and high-quality thread that blend with your yarn for a polished finish.
- Regularly check seam alignment and adjust tension during sewing for optimal invisibility.
- Practice repetitive, controlled stitching to develop muscle memory and achieve professional, seamless seams.

Heavy Duty Hand Sewing Needles Set – 12 Needles for Upholstery, Leather, Carpet Canvas Repair
- High-Quality Material: Nickel plated steel, durable and corrosion resistant
- Variety of Needle Sizes: 12 needles of different sizes and shapes
- Versatile Use: Suitable for leather, upholstery, tents, and more
As an affiliate, we earn on qualifying purchases.
As an affiliate, we earn on qualifying purchases.
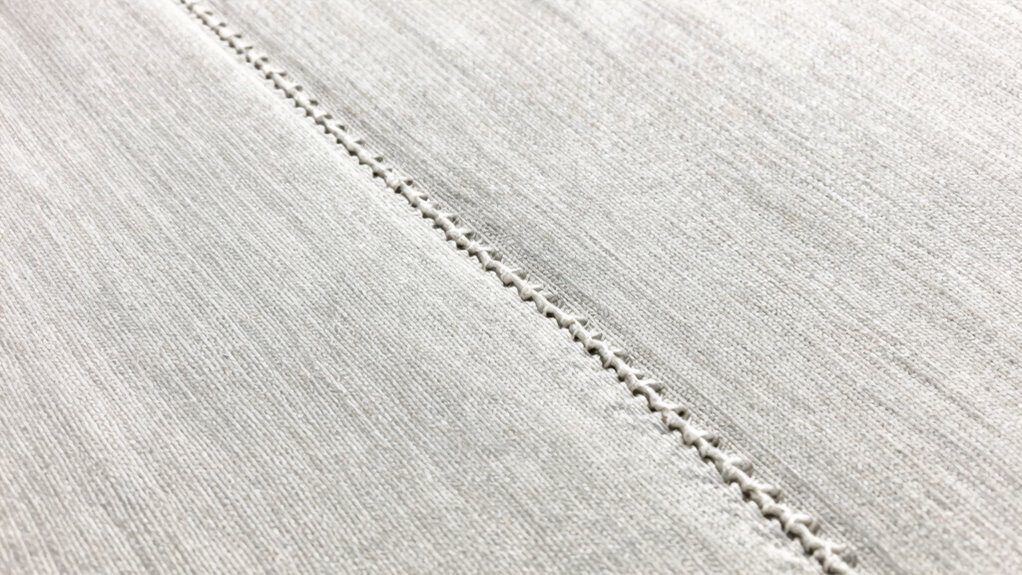
What Is Mattress Stitch and Why Is It the Best Seam Method?

If you want a seamless, durable join in your knitting projects, mattress stitch is the go-to method. It creates a nearly invisible seam by aligning the edges precisely, ensuring perfect seam alignment. You control tension by gently pulling the yarn as you sew, which helps the stitches sit flat and neat. This stitch is especially effective for seaming pieces of similar weight and texture, giving your finished project a professional look. Unlike other methods, mattress stitch doesn’t pucker or distort your fabric, maintaining the integrity of your work. It’s simple to learn and highly versatile, making it ideal for a variety of knitting projects. With a little practice, you’ll appreciate how effortlessly it blends your joins into the fabric, giving your project a clean, polished appearance. Additionally, mastering the technique’s tension control ensures consistent and flawless results every time. Proper tension management is crucial for seam stability and achieving a flawless finish.
Essential Tools and Materials for Mattress Stitch Sewing
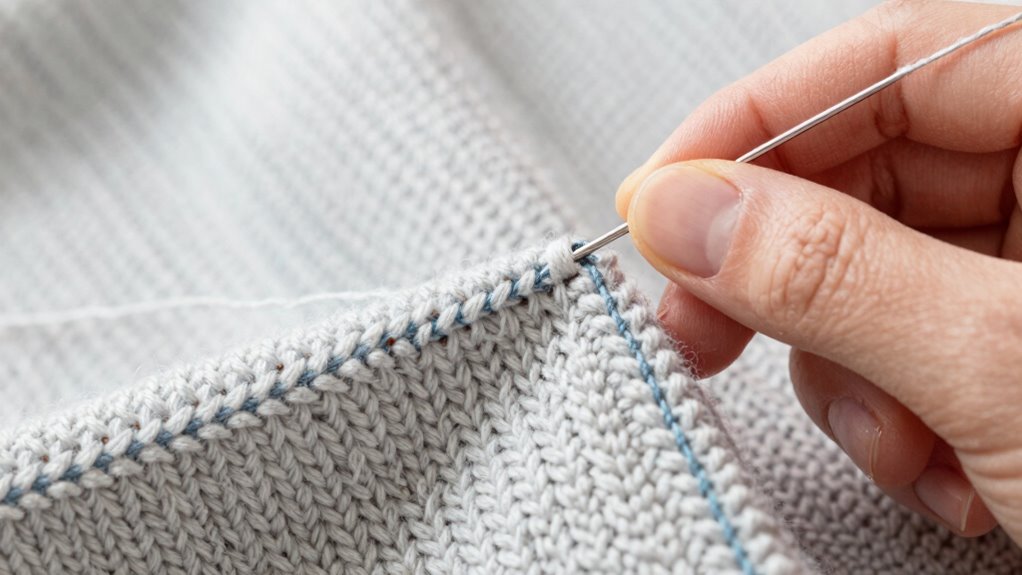
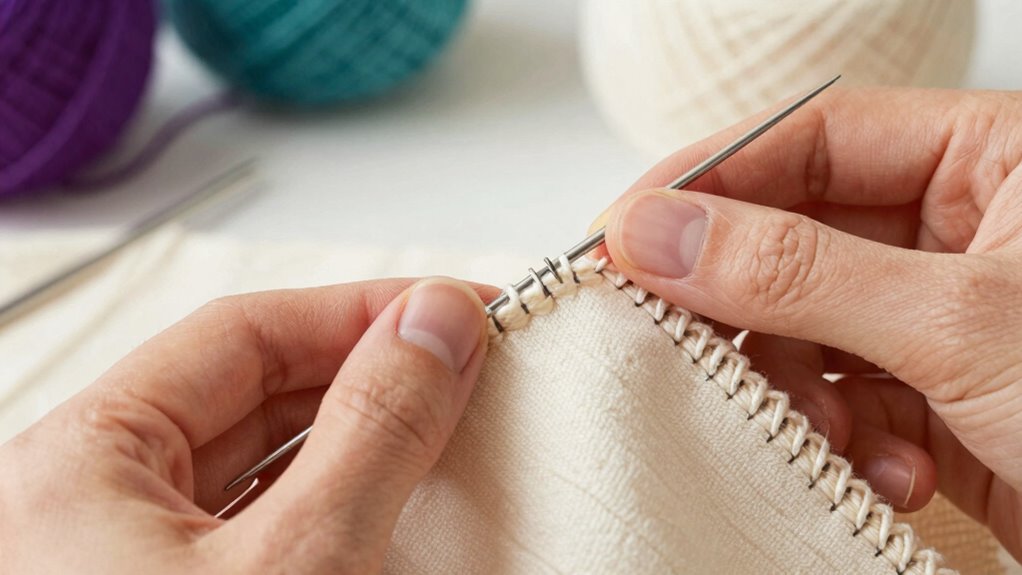
To sew a perfect mattress stitch, you’ll need the right tools and materials. Choosing the appropriate needle type, such as a blunt embroidery needle, makes a big difference, and selecting strong, compatible thread guarantees durability. Don’t forget marking tools like fabric chalk or a water-soluble pen to guide your seam precisely.
Essential Needle Types
Have you ever wondered which needles are best suited for mattress stitch sewing? For woven fabrics, a sharp, slender tapestry or chenille needle works well because it easily slips through tight weaves without damaging the fabric. These needles are strong enough to handle the weight of the stitches without bending. If you’re working with embroidery threads or thicker yarns, opt for a needle with a larger eye to accommodate the thread’s thickness. A crewel or embroidery needle can be ideal, as it allows smooth passage of the thread through fabric layers. Keep in mind that the needle’s length and point type influence your sewing comfort and stitch neatness. Choosing the right needle ensures your mattress stitch stays hidden, creating a seamless, professional finish. Additionally, understanding the body jewelry measurements is useful when handling or transporting your sewing materials, especially heavy-duty equipment or large fabric pieces. Knowing the proper needle size selection can further improve your stitching results and prevent fabric damage.
Suitable Thread Choices
Choosing the right thread is essential for achieving a neat, durable mattress stitch. Your thread selection should complement your yarn to ensure seamless joins and prevent puckering. When selecting thread, consider these key points:
- Yarn Compatibility: Match the thread weight and fiber type to your yarn for consistent tension and flexibility.
- Strength and Durability: Opt for strong, high-quality threads like polyester or silk to withstand wear without breaking.
- Color Matching: Choose a thread color that blends with or subtly contrasts your yarn, depending on your desired aesthetic.
Necessary Marking Tools
Before you begin sewing your mattress stitch, gathering the right marking tools is essential to guarantee accurate alignment and neat finishing. Accurate seam measurement helps you determine where to place your stitches, ensuring the fabric edges stay perfectly aligned. Use marking tools like fabric chalk, water-soluble markers, or tracing pencils—they’re easy to remove and won’t damage your knit. A ruler or measuring tape aids in precise seam measurement, especially for longer seams. Pinning the fabric pieces together can also serve as a helpful guide, preventing shifting during sewing. By selecting the right marking tools, you can easily mark your stitch lines and keep your seams consistent, making your mattress stitch clean and nearly invisible. Proper preparation ensures a professional-looking finish every time.
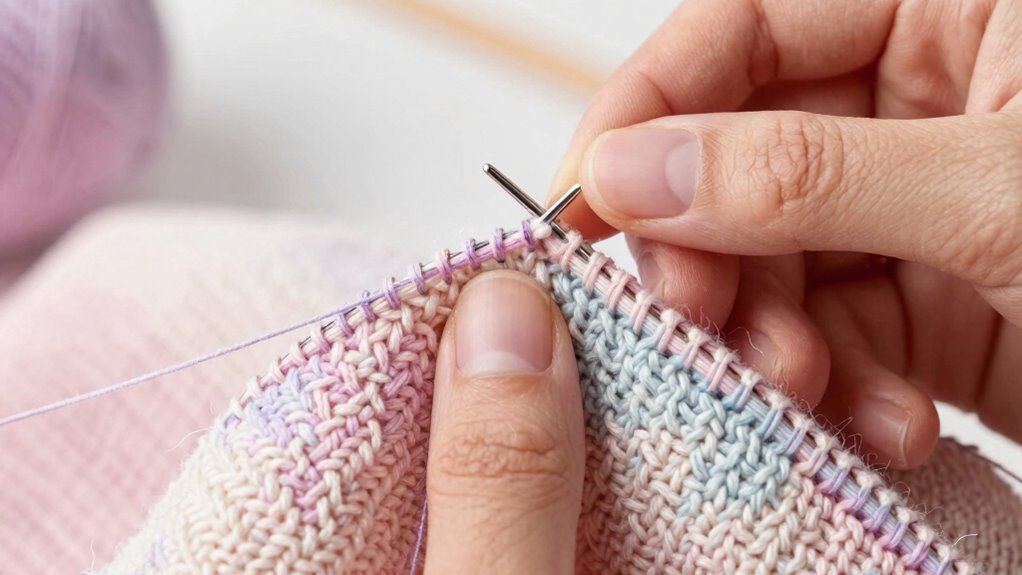
How to Prepare Your Knits for Seam Stitching
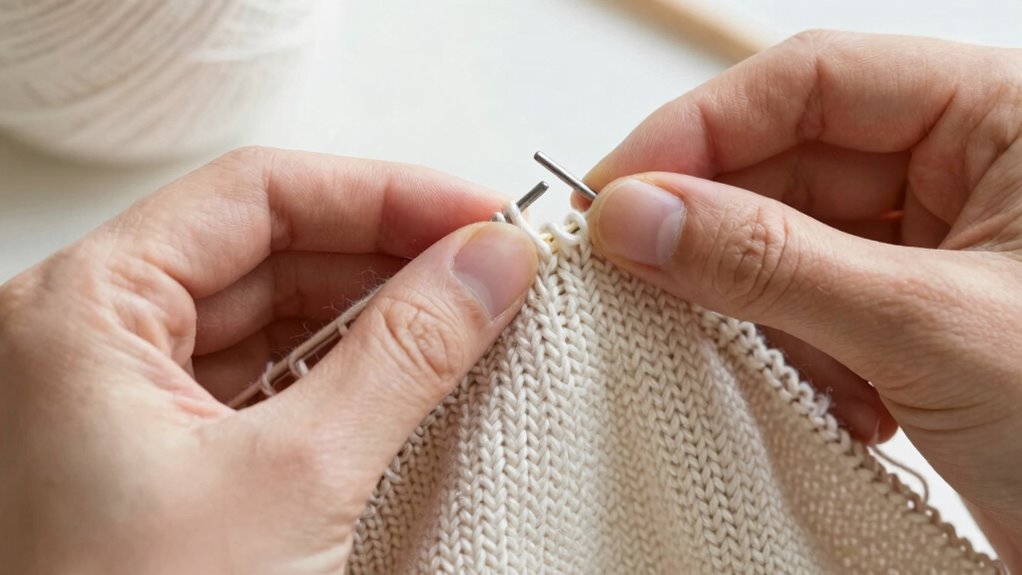
Before sewing your knits, make sure to choose the right yarn that matches your project’s weight and stretch. Properly blocking your knits helps even out tension and creates a smooth surface for stitching. When both are done, your seams will be neater and more durable. Ensuring your knit’s stitch consistency is uniform can also significantly improve the final appearance of your seams. Incorporating quality and client satisfaction into your process can lead to more professional results. Additionally, maintaining artistic expression in your knitting techniques can help you develop a more personalized and satisfying finish. Embracing AI training jobs techniques can further enhance your ability to create seamless joins and professional-looking results.
Choose Appropriate Yarn
Selecting the right yarn is essential for achieving a neat, durable seam in your knitting project. Your fiber selection influences the seam’s flexibility and appearance, so choose fibers that match your project’s purpose. When considering yarn weight, opt for a medium weight like DK or worsted, which are easier to manipulate and sew through smoothly. Keep these tips in mind: 1. Use the same fiber type as your main project to ensure consistency. 2. Choose a yarn weight that’s compatible with your knitting gauge. 3. Select a smooth, plied yarn for easier stitching and a cleaner finish. Additionally, understanding sound healing science can inspire a mindful, calming approach while working on your project, promoting relaxation and focus.
Properly Block Your Knits
Have you ever wondered why your seams look uneven or puckered? Properly blocking your knits helps guarantee a smooth, even finish. Start by using blocking techniques like pinning your pieces to a foam board or blocking mats, shaping them to their correct dimensions. Pay close attention to yarn tension—uniform tension during knitting prevents uneven stitches that can cause puckering. After pinning, lightly dampen your work with a spray bottle or soak it in water, then gently shape it to the desired size. Let your pieces dry completely before sewing. This process relaxes the fibers, evens out stitch tension, and creates a stable surface for seamless mattress stitching. Ensuring correct knit tension during your project is key to achieving a professional-looking finish. Proper blocking makes your join almost invisible, giving your finished project a professional look.
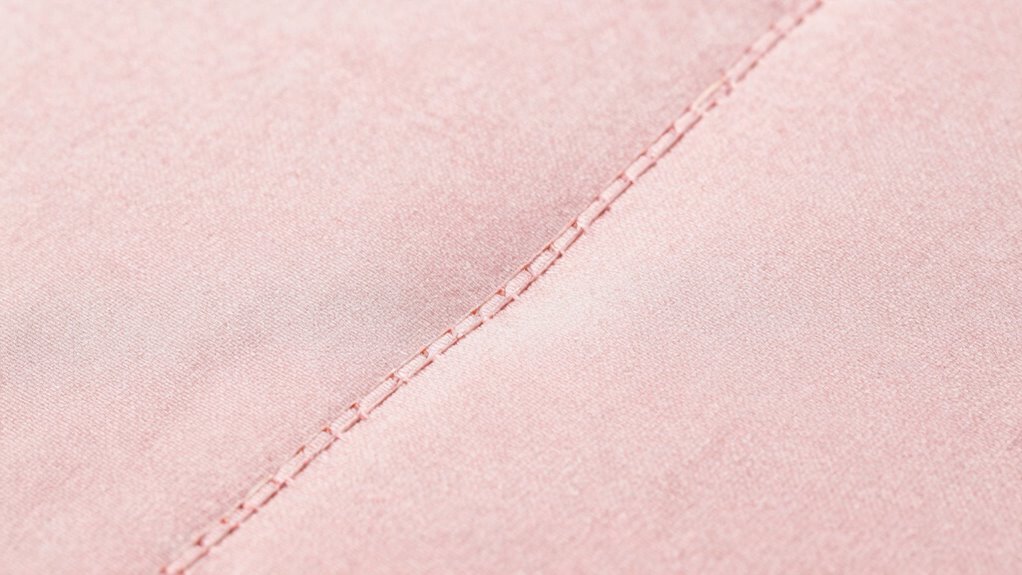
How to Mattress Stitch Seam for a Nearly Invisible Finish
Achieving a nearly invisible mattress stitch seam requires careful technique and attention to detail. First, ensure proper seam alignment by matching the stitches precisely on both sides. This keeps the join straight and tidy. Next, control tension consistently as you work; too tight causes puckering, while too loose results in gaps. To do this:
- Use even, gentle pulls to maintain uniform tension.
- Keep your yarn or needle tension steady throughout seam consistency.
- Regularly check your work to ensure the seam stays aligned and smooth. Paying close attention to seam alignment can greatly improve the overall finish. Additionally, understanding the importance of proper tension helps prevent common issues like puckering or gaps, ensuring a professional-looking result. Remember, practicing technique consistency is key to mastering a seamless join. Developing a keen sense of seam precision can also contribute significantly to achieving the desired invisibility of your stitches.
Focus on maintaining even seam alignment and tension control. These elements are key to creating a seamless finish that disappears into your knitting, giving your project a professional, polished look.
Tips for Making Your Mattress Stitch Seam Seamless and Strong
To guarantee your mattress stitch seam is both seamless and strong, focus on consistent tension and precise technique throughout the process. Use sewing machine tips like adjusting stitch length and maintaining even pressure to prevent puckering or gaps. When working with different fabric textures, consider their stretch and thickness; smoother fabrics often require lighter tension, while textured or thicker fabrics may need firmer control. Keep your yarn or thread tension uniform to ensure the stitch holds securely without puckering. Also, use a sharp needle suited to your fabric to avoid skipped stitches or uneven joins. Consistency is key—regularly check your tension and technique as you sew. Modern sewing techniques can further enhance your results by integrating automation and precision tools. These tips help create a durable, neat seam that blends seamlessly into your fabric, and understanding fabric properties can make a significant difference in achieving a professional finish. Additionally, practicing proper sewing posture can improve your control and reduce fatigue, leading to better overall seam quality.
Common Mistakes to Avoid When Mattress Stitching

Even with the best intentions, common mistakes can undermine the strength and appearance of your mattress stitch. One key error is misaligned seams, which can make the join obvious and weaken the overall fabric. To prevent this, ensure proper seam alignment by carefully matching edges before stitching. Another mistake is inconsistent stitch tension, which causes puckering or loose joins. Maintain even tension throughout to keep the seam smooth and secure. Additionally, rushing the process can lead to uneven stitches or missed stitches, compromising durability. Focus on these points:
- Double-check seam alignment before stitching.
- Keep stitch tension even throughout.
- Take your time and work steadily.
A lack of attention to detail can result in noticeable flaws or weakened seams, so staying mindful of each step is essential. Proper technique and patience are key to achieving a seamless, durable finish. Incorporating proper tools can also make the process smoother and more precise. Being aware of common mistakes can help you troubleshoot issues early and improve your overall technique. Recognizing sustainable practices in your stitching approach can also contribute to more environmentally friendly results. Avoid these pitfalls, and your mattress seam will be nearly invisible and long-lasting.
Different Types of Mattress Stitch for Various Projects

There are several variations of mattress stitch you can choose from, depending on your project’s needs. Classic techniques work well for most basic sewing, but specialty seam methods can give your finished piece a unique look or added durability. Understanding these options helps you select the best stitch for any project. Additionally, craftsmanship plays a crucial role in achieving seamless and professional results with mattress stitch variations.
Classic Mattress Stitch Variations
Different projects call for different approaches to the classic mattress stitch, and understanding these variations can substantially improve your finishing results. Variations mainly focus on adjusting seam alignment and stitch tension to suit the fabric and project needs.
- Standard Mattress Stitch: Maintains even seam alignment and uniform stitch tension, ideal for most knit projects requiring a smooth join.
- Invisible Mattress Stitch: Slightly looser stitch tension ensures the seam disappears, perfect for delicate or lightweight knits.
- Reinforced Mattress Stitch: Tightens stitch tension for added durability, suitable for areas with frequent wear or stress.
Experiment with these variations to achieve seamless joins tailored to your project’s fabric type and use. Proper control of seam alignment and stitch tension ensures a clean, professional finish every time.
Specialty Seam Techniques
When selecting a mattress stitch technique, consider the specific requirements of your project and the fabric you’re working with. For projects needing extra seam reinforcement, opt for variations that incorporate stronger, more secure stitches to prevent unraveling. Some specialty techniques include decorative stitching, which adds visual interest while strengthening the join. These methods are ideal for decorative garments or heirloom pieces where appearance matters. You can also choose different tension levels or stitch sizes to suit delicate or heavy fabrics. Using specialty seam techniques allows you to customize your finish, balancing durability with aesthetics. Whether you’re sewing a cozy blanket or a detailed quilt, exploring these options ensures your seams are both functional and visually seamless, elevating your craft with precision.
How to Fix Puckered or Visible Seams
Puckered or visible seams can detract from the overall look of your mattress, but fixing them is straightforward if you follow the right steps. Seam puckering often results from tension issues or uneven stitching. To correct visible stitching or puckering:
- Gently tug the seam open slightly and realign the stitches, ensuring even tension.
- Use a seam ripper to carefully undo problematic stitches, then resew with a consistent, moderate tension.
- Press the seam lightly with an iron on a low setting to flatten puckers without damaging the fabric.
Finishing and Securing Your Mattress Stitch Seam for Durability
To guarantee your mattress stitch seam holds up over time, it’s essential to properly finish and secure it. Start by weaving the yarn tails securely into the inside of the seam to reinforce the stitch and prevent unraveling. Use small, tight stitches when securing the ends, ensuring the seam remains durable through wear and washing. Consider adding a second pass of reinforcement if the project requires extra seam durability, especially for items subject to frequent use. Trim any excess yarn close to the stitches to avoid bulk, but leave a small tail to prevent unraveling. Proper finishing not only enhances seam strength but also creates a clean, professional look. These techniques ensure your mattress stitch remains seamless and resilient over time.
Practice Exercises to Master Mattress Stitch Techniques
Practicing mattress stitch techniques regularly helps you become more confident and precise with your sewing. To improve, try these exercises:
- Work on sample swatches using different knitting patterns to practice aligning edges smoothly.
- Create small swatches from sewing patterns to perfect your stitch tension and seam consistency.
- Repeat the same seam multiple times, gradually increasing speed while maintaining neatness.
Focus on maintaining even tension and consistent stitch size, especially when working with varied knitting or sewing patterns. These exercises help you recognize common challenges and develop muscle memory. Over time, you’ll sew nearly invisible seams that seamlessly join your projects, elevating your craft. Mastery comes through repetition, so keep practicing, and you’ll see your mattress stitch skills improve steadily.
Frequently Asked Questions
Can Mattress Stitch Be Used on All Types of Knit Fabrics?
Yes, you can use mattress stitch on most knit fabrics, but keep in mind that fabric stretch affects seam durability. For stretchy knits like jersey or ribbing, mattress stitch helps create a seamless look while maintaining flexibility. However, on delicate or non-stretch fabrics, the seam might not hold as well. Always test a small section first to confirm the stitch provides the desired seam durability without compromising the fabric’s stretch.
How Do I Choose the Right Yarn for Seamless Seams?
To choose the right yarn for seamless seams, you should consider yarn weight and fiber compatibility. Opt for a yarn weight similar to your project’s main yarn to ensure consistency and ease of joining. Additionally, select fibers that match in stretch and texture to prevent puckering or gaps. This way, your seams will stay smooth and durable, creating a polished, professional finish that blends effortlessly with the rest of your knit.
Is Mattress Stitch Suitable for Both Hand and Machine Knitting?
Yes, mattress stitch is suitable for both hand knitting and machine knitting. When hand knitting, you can easily use mattress stitch to create nearly invisible seams, perfect for seamless projects. For machine knitting, you might need to adjust tension or technique, but it still works well for joining pieces smoothly. Whether you’re hand or machine knitting, mattress stitch helps you achieve a clean, professional finish every time.
How Do I Remove or Undo a Mattress Stitch Seam?
Oh, the thrill of seam correction—undoing a mattress stitch seam is surprisingly simple. Just carefully pick out the stitches with a seam ripper or crochet hook, working slowly to avoid damaging your fabric. Once you’ve loosened the stitches, gently pull the yarn free. For stitch removal, take your time, ensuring your work remains intact. It’s a delicate dance, but with patience, you can undo that seam effortlessly.
What Techniques Help Prevent Gaps or Uneven Stitches?
To prevent gaps or uneven stitches, focus on maintaining tension consistency throughout your knitting. Keep your tension even as you work, ensuring stitches stay uniform. Additionally, choose the right needle size; using needles that suit your yarn weight helps create even stitches. Regularly check your tension and adjust if needed. These techniques help you achieve a smooth, seamless finish, making your seams look professional and polished.
Conclusion
Now that you’ve mastered the mattress stitch, imagine your knits coming together seamlessly, like gentle waves merging on a calm shore. Each stitch disappears into the fabric, leaving behind a smooth, invisible seam that whispers of craftsmanship. With patience and practice, your projects will look polished and professional, turning simple stitches into a hidden masterpiece. Keep practicing, and watch your seams blend effortlessly, transforming your knitting into a work of art that feels as good as it looks.