To piece quilt blocks, start by selecting fabrics based on color theory to create a balanced design. Use precise cutting tools to cut fabric shapes with a quarter-inch seam allowance, then sew pieces together carefully, pressing seams flat. To assemble the quilt sandwich, layer the quilt top, batting, and backing fabric, then pin or spray baste to keep everything in place. With proper techniques and attention to detail, you’ll craft a beautiful quilt—continue to explore these steps for more tips.
Key Takeaways
- Cut fabric pieces precisely using a rotary cutter, ruler, and cutting mat to ensure accurate quilt blocks.
- Sew fabric pieces together with a consistent quarter-inch seam allowance, pressing seams properly for flatness.
- Arrange and sew quilt blocks in the desired pattern, nesting seams to reduce bulk and ensure alignment.
- Layer the quilt top, batting, and backing fabric, then secure with pins or spray adhesive to create a stable quilt sandwich.
- Quilt through all layers with even stitches, then trim excess and add binding for a polished, durable finish.
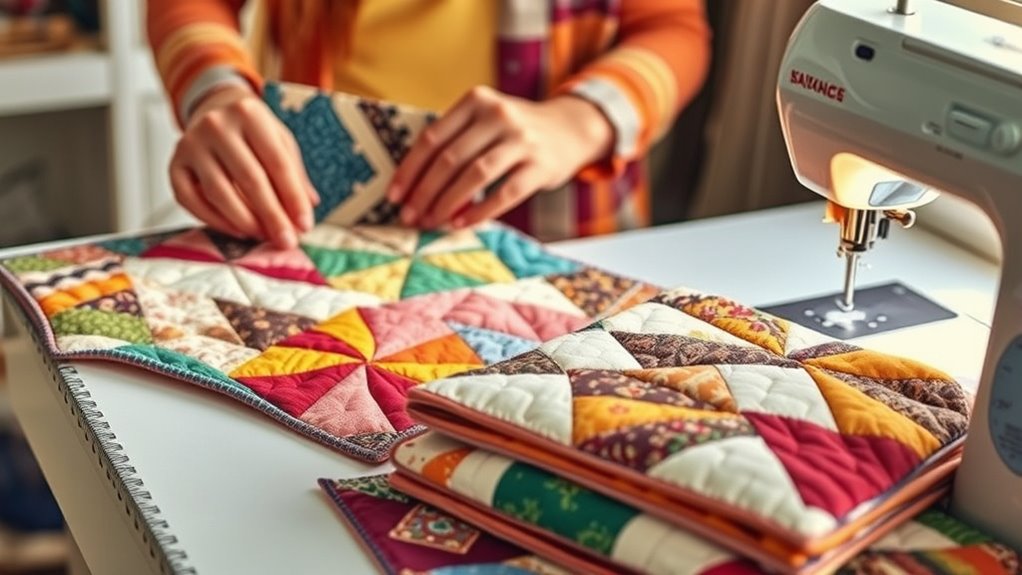
Have you ever wondered how to turn fabric into a beautiful quilt? The first step is understanding how to piece quilt blocks effectively. It all begins with choosing your fabrics, which can be guided by color theory. By understanding how colors work together—complementary, analogous, or monochromatic—you can create visually appealing arrangements that enhance your quilt’s overall look. Once you’ve selected your fabrics, you’ll need the right quilting tools. A rotary cutter, cutting mat, and quilting ruler make cutting precise pieces easier, while pins and seam rippers help with accuracy and adjustments. These tools are essential for achieving clean, straight seams and consistent block sizes.
Choose fabrics using color theory and gather essential quilting tools for precise, beautiful blocks.
When you’re ready to sew, start by laying out your fabric pieces according to your pattern, paying attention to how the colors and prints interact. Use your quilting tools to cut your fabric into squares, rectangles, or other shapes, ensuring each piece is exactly the right size. As you sew, press your seams carefully to one side or open, depending on your pattern, to minimize bulk and create smooth intersections. Accurate seam allowances are vital, so pin pieces together before sewing to keep everything aligned. Stitch with a consistent seam allowance—usually a quarter-inch—to ensure your blocks fit together perfectly later on.
Once your individual quilt blocks are sewn, it’s time to assemble the quilt top. Lay out your blocks in the desired arrangement, which again benefits from an understanding of color theory to balance the design. Sew the blocks together row by row, pressing seams in opposite directions to reduce bulk and facilitate nesting seams when joining rows. When the quilt top is complete, you’ll need to create a quilt sandwich by layering your quilt top with batting and backing fabric. Using quilting tools like basting pins or spray adhesive helps keep everything in place, preventing puckering or shifting during quilting. Additionally, selecting the appropriate materials for your quilt sandwich can impact the durability and appearance of your finished quilt.
Sewing the quilt sandwich involves quilting stitches that secure all three layers. You can do straight-line quilting, which is simple and effective, or experiment with decorative stitches if you’re feeling creative. Whichever method you choose, maintaining consistent stitch length and tension guarantees a professional finish. Once quilting is done, trim the excess batting and backing, and add finishing touches like binding to give your quilt a polished look. Throughout this process, your understanding of color theory and familiarity with quilting tools will help you produce a beautiful, cohesive quilt that showcases your skills and creativity.
Frequently Asked Questions
What Are the Best Tools for Beginners in Quilting?
For beginners, essential tools include sharp quilting needles for smooth quilt block assembly, and a good rotary cutter to make precise cuts. You’ll also want a cutting mat, quilting ruler, and sewing machine suited for quilting projects. These tools help you accurately piece blocks and sew a quilt sandwich. Starting with these basics makes quilting easier, more enjoyable, and sets a strong foundation for your skills to grow.
How Do I Choose the Right Fabric for My Quilt?
Choosing fabric is like dating—trust your instincts but stay cautious. For fabric color selection, pick hues that make your heart sing or match your room’s vibe. When it comes to fabric pattern coordination, balance bold prints with subtle ones so your quilt doesn’t look like a circus. Ultimately, go with fabrics that inspire you and work well together; after all, a happy quilt is a beautiful quilt.
Can I Machine Quilt on a Home Sewing Machine?
Yes, you can definitely machine quilt on a home sewing machine. Machine quilting allows you to add intricate designs and secure your quilt layers efficiently. Make sure your machine has a walking foot or quilting foot for better fabric control, and use a quilting needle for smooth stitching. Practice on scrap fabric first to get comfortable with machine quilting, and take your time to achieve professional-looking results in your home sewing projects.
How Do I Fix Common Quilting Mistakes?
When fixing common quilting mistakes, start by checking your sewing seam accuracy and carefully rip out any uneven stitches. Adjust your fabric tension to make certain smooth, even stitching, preventing puckering or skipped stitches. Rethread your machine if needed, and sew slowly to maintain control. Taking these steps helps correct mistakes efficiently, resulting in a polished quilt finish. Practice patience, and your quilting skills will improve over time.
What Are Some Tips for Quilting With Different Fabric Types?
When quilting with different fabric types, you should prioritize fabric care by pre-washing to prevent shrinking or color bleeding. Keep color coordination in mind, choosing fabrics with similar hues or complementary shades to ensure a cohesive look. Use sharp needles and appropriate stitches for each fabric type, and test on scrap pieces first. This approach helps your quilt stay beautiful and durable, no matter what fabrics you use.
Conclusion
With these basic quilting techniques, you’re now armed with the tools to turn fabric scraps into a beautiful masterpiece. Think of each quilt as a story woven with your hands, stitches, and patience. As you piece blocks and sew your quilt sandwich, let your creativity flow like a gentle river guiding your project to completion. Remember, every stitch brings you closer to a cozy, heartfelt creation you’ll cherish for years to come.