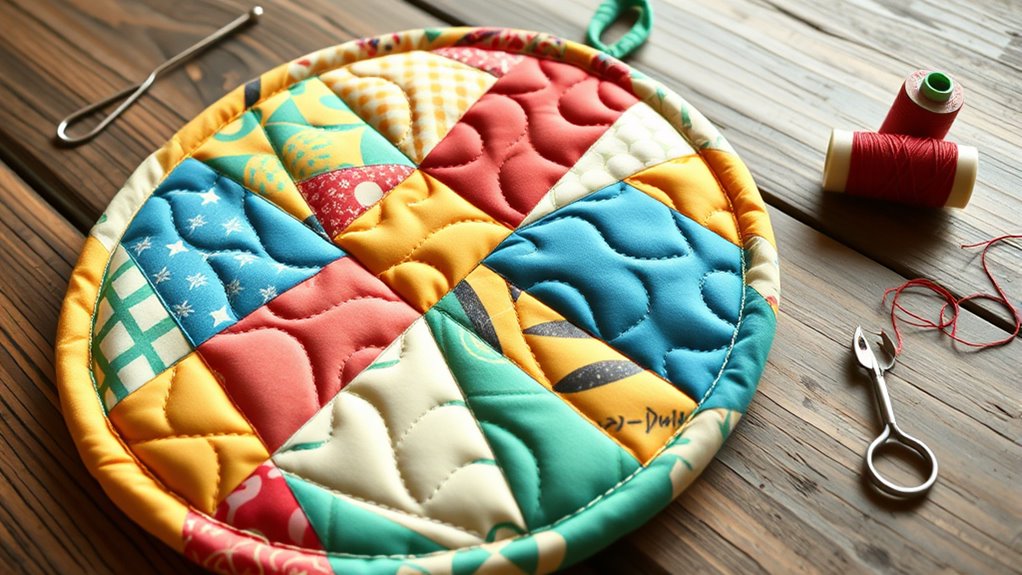
To make a DIY quilted pot holder, start by selecting heat-resistant fabrics like cotton or terry cloth in vibrant or solid colors, and pre-wash them. Cut two fabric layers and batting, then sew them together with a simple straight stitch, quilting in a grid or decorative pattern for added heat protection. Finish edges with zigzag stitches or binding. With these basic steps, you’ll craft a cozy, stylish, and functional pot holder—keep going to discover detailed tips and techniques.
Key Takeaways
- Select heat-resistant fabrics like cotton or terry cloth, pre-wash, and cut to desired size with accurate tools.
- Layer two fabric pieces with insulating batting, then sew around edges with a straight stitch, reinforcing with zigzag or binding.
- Quilt through all layers in a grid or decorative pattern, maintaining even stitches for durability and visual appeal.
- Finish edges with topstitching, leaving an opening for turning, then close neatly for a polished look.
- Add personal touches, ensure neat seams, and test for heat resistance to create a functional, stylish pot holder.

Ever wondered how to create a cozy, functional kitchen accessory that you can customize yourself? Making a quilted pot holder is a perfect beginner project that combines practical use with a touch of creativity. The first step is understanding fabric selection. Choose high-quality, heat-resistant fabrics like cotton or terry cloth, which can withstand hot pots and pans. Look for vibrant patterns or solid colors that match your kitchen decor. Make sure your fabrics are pre-washed to prevent shrinkage after you finish your project. When selecting your fabric, consider contrasting colors or patterns for a more visually appealing design, and always opt for tightly woven fabrics for durability.
Once you’ve picked out your fabric, it’s time to focus on sewing techniques. For this project, accurate cutting and straight seams are essential to ensure your pot holder is safe and sturdy. Use a ruler and fabric scissors or a rotary cutter to cut out your fabric pieces precisely. Typically, you’ll want two layers of fabric for the front and back, plus some insulating batting in between for heat protection. When sewing, start with a simple straight stitch, making sure your seams are even and secure. Use a sewing machine if you have one; it speeds up the process and provides cleaner stitches, but hand sewing works well too if you’re just starting out.
To achieve a quilted look, sew through all layers in a grid pattern or a decorative design of your choice. This quilting not only adds visual interest but also keeps the batting evenly distributed, enhancing the pot holder’s heat resistance. When sewing, keep your stitch length consistent and backstitch at the beginning and end to reinforce your seams. If you’re new to sewing techniques, practice on scrap fabric first to get comfortable with your machine or hand stitching. For added durability, reinforce the edges with a zigzag stitch or binding, which also helps prevent fraying. Additionally, understanding sound vibrations can inspire creative patterns or even incorporate sound therapy elements into your craft projects for relaxation.
Incorporating sewing techniques like topstitching around the edges can give your pot holder a polished look and extra strength. Remember to leave an opening to turn your fabric right side out, and then close it with a neat slip stitch or topstitch. Throughout the process, take your time to ensure neat seams and even quilting lines. With patience and attention to detail, you’ll craft a cozy, functional, and stylish quilted pot holder that’s all your own. The satisfaction of creating something handmade for your kitchen makes this project especially rewarding, and once you get the hang of fabric selection and sewing techniques, you’ll be ready for even more DIY home accessories.
Frequently Asked Questions
Can I Use Different Fabrics for the Quilted Pot Holder?
Yes, you can definitely use different fabrics for your quilted pot holder. Choosing various fabric choices allows you to customize your design, showcasing your style and creativity. Mixing textures and colors enhances design versatility, making each pot holder unique. Just make certain the fabrics are heat-resistant and durable enough for kitchen use. This way, you get a functional, attractive piece that reflects your personal taste and adds charm to your kitchen.
What Are the Best Batting Options for Heat Resistance?
For heat resistance, you should choose insulation materials like silicone or wool batting, which provide excellent protection. Heat resistant fabrics such as aramids or flame-retardant cotton also enhance safety. Combining these insulation options with durable, heat-resistant fabrics ensures your pot holder can withstand high temperatures. Always verify the heat resistance ratings of your materials before sewing, so you’re confident your pot holder will keep you safe while handling hot pots and pans.
How Do I Customize the Size of My Pot Holder?
To customize your pot holder size, choose your fabric based on your desired dimensions. Cut your fabric and batting to your preferred measurements, ensuring extra seam allowance. Use precise sewing techniques, like straight stitching and reinforcing the corners, to secure the layers. Adjust the size by trimming or adding fabric pieces before sewing the edges. This way, you create a custom-sized, heat-resistant pot holder tailored perfectly for your needs.
Is There a Way to Add a Decorative Border?
Imagine your pot holder as a blank canvas ready for charm. Yes, you can add a decorative border with fabric trims or decorative stitching. Sew the trims along the edges for a polished look, or use decorative stitches to create intricate patterns. This personalized touch not only enhances its appearance but also adds a bit of personality, making your kitchen feel warmer and more inviting.
How Do I Wash and Care for My Quilted Pot Holder?
To care for your quilted pot holder, wash it in cold water on a gentle cycle to preserve the fabric care. Avoid bleach, which can damage the stitches. For stain removal, treat spots promptly with a mild detergent or stain remover before washing. Air dry or tumble dry on low heat to prevent shrinking. Regular cleaning keeps it safe for food handling and maintains its durability and appearance.
Conclusion
Now, picture yourself grabbing your cozy, handcrafted pot holder, its textured surface warm beneath your fingertips. As you hang it up or settle it on your countertop, you’ll feel a sense of pride in your creation—each stitch a reminder of your effort and skill. This simple project transforms everyday cooking into a satisfying moment of accomplishment. So go ahead, enjoy the comfort and charm of your DIY quilted pot holder, knowing you made it with your own hands.